

Contents of this article:
- 1. Learning outcomes
- 2. Switching to the professional user interface
- 3. Introducing templates+
- 4. Introducing categories+
1. Learning outcomes
When you have finished this article, you should be able to:
- Design simple templates
- Save your templates for future use
- Design templates by reusing and/or modifying previously created templates
- Change the look of an individual element
- Change the look of a subset of elements
- Create knowledge categories
- Move an individual element to a desired category
- Move a subset of elements to a desired category
2. Professional user interface
Before we begin this step-by-step tutorial, there are two vital things you need to set up in SuperMemo in order to be able to practice tasks described in this article without unnecessary interruptions:
- You need to switch to the professional level to make all program options available,
- You need to arrange the windows layout to ensure maximum efficiency and convenience.
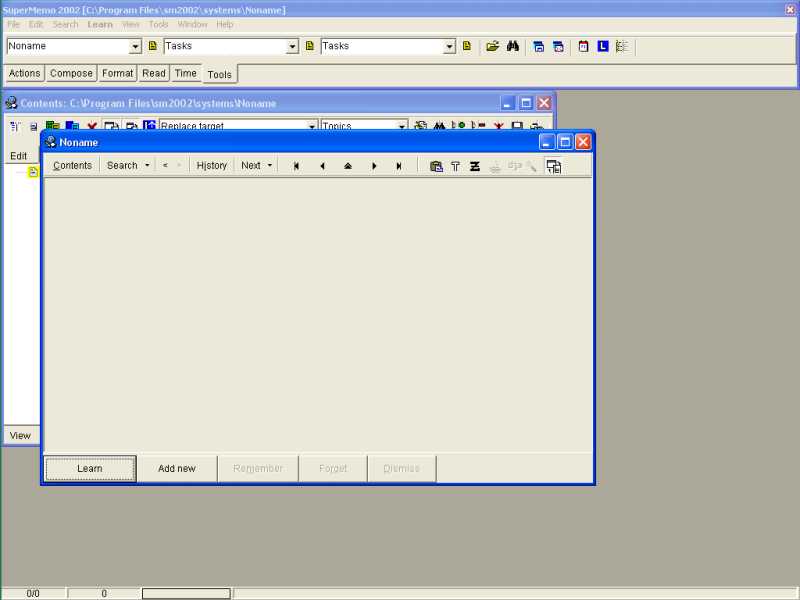
If you already have (1) the professional level on and (2) the windows layout similar to the
one in the picture below, you can immediately proceed to the next step.
Otherwise, it is recommended you set up the windows layout according to the
list at the bottom of this page.
To switch to the professional user interface:
- Choose File : Level : Professional to make all program options available,
- Choose Window : Dock (Ctrl+Alt+F11) to show the toolbar docking window,
- Choose Window : Background (Ctrl+Alt+F10) to hide the desktop behind SuperMemo,
- Press the Contents button (Alt+C) to open the contents window,
- On the Edit toolbar, turn on the Synchronize button
 for the element window to display the currently selected element in the contents window,
 - Arrange the contents and element windows so that they overlap with the element window over the contents window,
- In the element window, on the element toolbar, turn on the Synchronize button
to select the currently displayed element in the contents window,
- Click the Tools toolbar to make it active,
- Choose Window : Layout : Save custom layout to save the current layout,
- In the New layout dialog box, in the Input name text box, type in a unique name (e.g. Professional Interface) for the layout you have just arranged,
- Click OK to save the layout under a chosen name.
-
If you wish the current layout to be your default layout each time you open SuperMemo,
you would rather choose Window : Layout : Save as default
(Ctrl+Shift+F5) in the menu bar.
-
If you change the windows arrangement, you can later restore the
Professional Interface by choosing Window :
Professional Interface in the menu bar.
3. Templates
Templates define the looks of your pages of knowledge (so called SuperMemo elements). You use templates to give the elements in your collection your preferred look (e.g. you may want your Biology items to be displayed in white font against green background).
You have to learn three basic skills in order to give the elements in your collection your preferred look:
- 1st skill: Designing a template
- 2nd skill: Saving your template for future use
- 3rd skill: Applying your template to an element (i.e. giving it the designed look)
Templates are made of components. For example, if you would like your templates to display text, you should add one of the 3 main text components (i.e. TEXT, RTF, HTML) for displaying text to your template. Similarly, if you would like your template to display an image, you should add the image component to your template. In SuperMemo 2002, there are fourteen different types of components for including text, image, sound, video, etc. in your templates. They are all available on the Compose toolbar. Furthermore, each component has specific properties that enable you to customize its appearance or control the way it behaves. They are available from the component menu
Templates are saved in the template registry. Think of the template registry as a repository, in which you can browse templates as well as reuse them to give more elements a selected look. To reuse your template, you have to first save it in the template registry
3.1. Designing templates
3.1.1. Designing your first template from scratch
Suppose you are adding lots of items related to the Treaty of Nice (a plan for expanding the European Union). Suppose you would like to give all items related to the European Union a separate look. It would draw on the flag of the European Union with its twelve gold stars forming a circle against the background of the blue sky. Let your new template be composed of two text components, one for the question part and the other for the answer part of an item, with a yellow font used in both components against the element's blue background.
4 major steps are required to design such a template from scratch:
- STEP 1: Adding a new empty element to your collection
- STEP 2: Placing components on the element
- STEP 3: Setting the element's properties
- STEP 4: Setting the properties of components
STEP 1: Adding a new empty element to your collection:
- Click the Contents button (Alt+C) to switch from the element window to the contents window,
- On the Edit toolbar, in the Type box, click the drop-down arrow, and then select Items,
- In the knowledge tree, select an element, to which a new empty child element will be added,
- Click the Add button to add a new empty child element to the currently selected element,
- Right-click the newly added empty child element, and then choose View : Selected element (Ctrl+Enter).
-
As a result, all new elements, which you will add to the knowledge tree, are going to be items.
-
You should now be able to see the newly added empty element in the element window.
STEP 2: Placing components on the element:
- Place the first text component on the element (the question part)
- You need only 3 clicks to create a component on an element (e.g. a picture):
- 1st click: Select a component on the Compose toolbar,
- 2nd click: Point where you would like the component's top-left corner to be placed in the element,
- 3rd click: Point where you would like the component's bottom-right corner to be placed
- If you would like to change a component's location within element:
- 1. Right-click a component, and then choose Mode : Dragging mode (Alt+click will do the same in most cases)
- You should now be able to drag the component, which has become darker in color, to a new location.
- 2. Click the component, and then drag it to a new location without releasing the mouse button,
- 3. Once you are satisfied with the new location of the component, release the mouse button, and then press Esc to exit the dragging mode.
- You can inspect the present location of the component in respect to the top-left corner of the element by peeking at the X and Y values on the right from the Dismiss button.
- If you would like to resize a component:
- 1. Click a component to set it in the editing mode,
- 2. Point to the component border,
- 3. When the mouse pointer becomes a double-headed arrow, drag the border,
- 4. Once you are satisfied with the new size of the component, press Esc to exit the editing mode.
- You can inspect the width and height of the component by peeking at the W and H values on the right from the Dismiss button.
- In a similar fashion (as described in Point 1 of this step), add the second text component in the element.
STEP 3: Setting the element properties
To change the color of the element's background:
- Choose Edit : Menus : Element> (Alt+F10) in the menu bar,
- In the element menu, select Color,
- In the Color dialog box, click a desired color (e.g. blue),
- Click OK to close the dialog box and save the selection you have made.
- Your element's background should now become blue.
STEP 4: Setting properties components
To make the answer component invisible when the question part of the item is asked:
- Right-click the second component, in which you are going to type in the answer part of an item, and then select Answer.
To change the font, which is going to be displayed in the question and answer components:
- To set a new font in the question component:
- Right-click the question component, and then choose Text : New font,
- In the Font dialog box, select the font and/or set its properties (e.g. Times New Roman, Bold, 18, Yellow),
- Click OK to close the dialog box and save the selection,
- In the New registry member name dialog box, in the Unique name text box, type in a unique name (e.g. European Union), under which the font you have selected and its properties you have set (if any) will be stored in the font registry,
- Click OK to save the font under a chosen name.
- You should now be able to see your new font displayed in the question component.
- If the question component is empty (i.e. it contains no text), type in an arbitrary word (e.g. question) to inspect if it is displayed in your font.
- To reuse the newly added font in the answer component:
- Right-click the answer component, and then choose Links : Font (Shift+Ctrl+F),
- In the Font registry window, in its left pane, select the European Union font registry member,
- Click the Accept button to close the registry window and display the font in the answer component.
- If the answer component is empty (i.e. it contains no text), type in an arbitrary word (e.g. answer) to inspect if it is displayed in your font.
3.1.2. Saving templates for future use
Once you have designed your template, you should save it in the template registry. If you save your template in the registry you will later be able to use it in other elements, too.
To save your template in the template registry:
- Right-click over the element toolbar, and then choose Template : Save as template,
- In the Template registry dialog box, in the Input template name text box, type in a unique name (e.g. European Union), under which the template you have designed will be stored in the template registry,
- Click OK to save the template under a chosen name.
If you wish to save your template in the registry and make it the default template for the currently selected category, use Template : Save as default (Ctrl+Alt+M) from the element menu. This template will now be used with each new element added to this category.
- To find out which category is currently selected, click the Tools toolbar, and then peek at the Category box (the first from the left).
3.1.3. Designing a new template by modifying one of the previously created templates
Suppose you would like to design a template similar to the one you created before. It would also include two text components, however, you would like to change the element's background, the background of individual components, and the color of the font so they would all reflect the colors of the British flag. Thus designed template would be used for your English vocabulary items.
You could design this template by following the same steps as it was with your first template. However, your new template will be similar to the one created before (i.e. your new template and the European Union template will both have 2 plain text components). It is easier then to reuse the previously designed template, modify some of its properties, and save it under a different name in the template registry.
4 major steps are required to create a new template by using an old one:
- STEP 1: Adding a new item,
- STEP 2: Applying the previously designed template,
- STEP 3: Modifying element properties,
- STEP 4: Modifying components properties.
STEP 1: Adding a new item:
- Click the Add new button at the bottom of the element window or press Alt+A,
- Press Esc twice to exit the editing mode.
- Once your new template is ready and saved in the template registry, you can delete the element with which it was designed.
STEP 2: Applying the previously designed template:
- Right-click over the element toolbar, and then choose Template : Apply template (Shift+Ctrl+M),
- In the Template registry window, in its left pane, select the European Union template registry member,
- Click the Accept button to close the registry window and apply the European Union template to the newly added item,
- You should now be able to see the European Union template applied to the newly added item.
- Right-click over the element toolbar, and then choose Template : Impose template (Shift+Ctrl+F2),
- Click Yes to the Overwrite source data with the current template? Template=European Union query,
- Click Yes to the Detach the template? query.
- Remember to impose and detach the template if you do not want changes to one element affect all other elements using the template.
This will make sure you modify the template only in this element, not all elements that use this template.
STEP 3: Modifying element properties
To modify the element's background from blue to navy:
- Right-click over the element toolbar, and then select Color,
- In the Color dialog box, click a new color (e.g. navy),
- Click OK to close the dialog box and save the selection you have made.
STEP 4: Modifying component properties
To change the background of individual components:
- To change the background of the question component:
- Right-click the question component, and then choose Color,
- In the Color dialog box, click a new color (e.g. white),
- Click OK to close the dialog box and save the selection you have made
- Similarly, change the background of the answer component.
To change the font, which is going to be displayed in the question and answer components:
- To modify the already existing font in the question component:
- Right-click the question component, and then choose Text : New font,
- In the Font dialog box, select the font and/or set its properties (e.g. Times New Roman, Bold, 18, Red),
- Click OK to close the dialog box and save the selection,
- In the New registry member name dialog box, in the Unique name text box, type in a unique name (e.g. English), under which the font you have selected and its properties you have set (if any) will be stored in the font registry,
- Click OK to save the font under a chosen name.
- To reuse the newly modified font in the answer component:
- Right-click the answer component, and then choose Links : Font (Shift+Ctrl+F),
- In the Font registry window, select the English font registry member in the left pane, which shows the alphabetically sorted list of the individual registry members,
- Click the Accept button to close the registry window and display the font in the answer component.
Once you are done with the new template, you should save it in the template registry (as in 3.1.2. Saving templates for future use).
3.2. Changing the look of elements
3.2.1. Changing the look of an individual element
- Right-click over the element toolbar, and then choose Template : Apply template (Shift+Ctrl+M),
- In the Template registry window, in its left pane, select a template that you want to apply,
- Click the Accept button to close the registry window and apply the template you have selected to a given item.
3.2.2. Changing the look of a subset of elements
3.2.2.1. Changing the look of a subset of elements in the contents window
Use the contents window to change the look of elements belonging to a given branch:
- Click the Contents button (Alt+C) to switch from the element window to the contents window,
- In the knowledge tree, select a branch with elements, to which you would like to apply a new template,
- On the Edit toolbar, click the Branch menu button
 , and then choose Template : Apply template,
- In the Template registry window, in its left pane, select a template that you would like to apply,
- Click the Accept button to close the registry window and apply the template to all elements of the selected branch,
- Click Yes to the Do you want to apply a template to elements among all descendants of "Title of the selected branch" query,
- Click OK on an information dialog saying how many elements the new template has been applied to.
3.2.2.2. Changing the look of a subset of elements stored in the browser
Use browser to change the look of a subset of elements in your collection:
- On the Browser toolbar, click the Process browser button , and choose Template : Apply template,
- In the Template registry window, in its left pane, select a template that you would like to apply,
- Click the Accept button to close the registry window and apply the template to all elements in the browser,
- Click Yes to the Do you want to apply a template to elements among all browser elements? query,
- Click OK on an information dialog saying how many elements the new template has been applied to.
For additional hints&tips, complete reference, and rich collection of FAQs related to using templates, read: Templates
4. Categories
Categories can help you if you add elements belonging to different subjects (e.g. economics, computer science, geography, etc.) to different branches of the knowledge tree.
Categories make it also possible to set up the preferred look (of items or topics) belonging to the category.
The optimum strategy for maximizing the inflow of quality knowledge into the learning process at minimum time is to create a To Do category, to which you add all the knowledge you want to master (e.g. articles, rough notes, rough items, etc. belonging to all subjects). You can process this To Do knowledge for optimal recall in the course of repetitions. Only when items assume their ultimate well-structured shape, move them to their target category (see: 20 rules of formulating knowledge).
4.1. Creating your first category
Suppose you would like to create a separate category for your European Union items. Instead of the Item template used by default for newly added items, you could use your new European Union template. All items added to the category will have the European Union look (i.e. European Union template applied). You will only need to select the European Category in the category box on the Tools toolbar.To create the European Union category, in which all new items can have the look of the European Union template:
- Choose Edit : Create category in the menu bar
 ,
, - In Category and Tasklist Wizard, on the Location tab, in the Location box, select an element, to which your new category will be appended, and then click Next>> ,
- On the Name tab, in the Category name text box, type in a unique name of your category (e.g. European Union), and then click Next>> ,
- Choose a short name for your category so it would be easily identifiable in the Category box on the Tools toolbar.
- On the Templates tab, click the Change button below the Template for items text box ,
- In the Template registry window, in its left pane, select a template that you would like to be used each time you add an element to the new category (e.g. European Union) ,
- Click the Accept button to close the registry window and save selection you have made ,
- Click Finish to close the wizard and create the European Union category with the European Union template as the default item template (i.e. template which will be used each time you add an item to this category) and exit the wizard.
4.2. Moving elements to a desired category
4.2.1. Moving an individual element
Suppose you had imported an article about Irish referendum on the expansion of the European Union. Imagine that in the course of incremental reading you extracted an item that you would like to move to your European Union category.
To move an element to a category:
- Right-click over the element toolbar, and then choose Edit : Element parameters (Ctrl+Shift+P),
- In the Element Parameters dialog box, in the Category box, click the drop-down arrow, and select European Union,
- Click OK to close the dialog box and save the selection you have made,
- Click Yes to the Apply category template? Template=European Union query,
- 1. Choose Search : Categories in the menu bar,
- 2. In the Category registry window, in its left pane, select a desired category (e.g. European Union),
- 3. In the top-right pane, click the Auto-Apply checkbox until it is checked but not grayed,
- 4. Click Accept if you want the category to become the default category (i.e. the category that will be used at Add new).
You should now be able to see this item with the category template applied.
If you do not wish to be prompted to apply category template at moving elements:
4.2.2. Moving a subset of elements
Use browser to move a subset of elements to a desired category:
- On the browser toolbar, click the Process browser button , and then choose Move : To a category,
- In the Category registry window, in its left pane, select a category that you would a given subset of elements to be moved to,
- Click the Accept button to close the registry window and move the subset of elements in the browser to the selected category,
- Click Yes to the Do you want to move all browser elements? query,
- Click OK on an information dialog saying how many elements have been moved to the selected category.
For additional hints&tips and a rich collection of FAQs related to using categories, read: Categories


